
Editor’s note: As of now, SalvationDATA has successfully extracted data from the various mobile devices, such as cell phones, smartphones, tablets, etc. Among devices to be examined, we came across defective mobile devices (damaged mechanically, by fire or phone has water inside) from which digital evidentiary data should also be extracted. We provide several approaches to examining damaged mobile devices and today we would like to share with you how Chip-off works.
Chip-off forensics is an advanced digital data extraction and analysis technique which involves physically removing flash memory chip(s) from a subject device and then acquiring the raw data using specialized equipment. Chip-off forensics is a powerful capability that allows collecting a complete physical image of nearly any device – even those which have suffered catastrophic damage.
When should a Chip-Off extraction be considered?
Typically, when all other forensic extraction options – including JTAG – have been exhausted; however, there are certain situations in which a chip-off may be the initial preferred method. These include situations in which it is important to preserve the state of memory exactly as it exists on the evidence device.
What type of devices can be extracted with a Chip-Off?
Most of our chip-off projects involve extracting data from cellular phones; however, the chip-off method can be used to extract data from nearly any device that utilizes flash memory (NAND, NOR, OneNAND or eMMC). In addition to cell phones, we have extracted data from digital voice recorders, GPS units, tablets, USB drives, gaming systems, and network devices. The goal for the mobile-device forensic examiner is to obtain a physical image of the memory chip bit-by-bit from mobile devices.


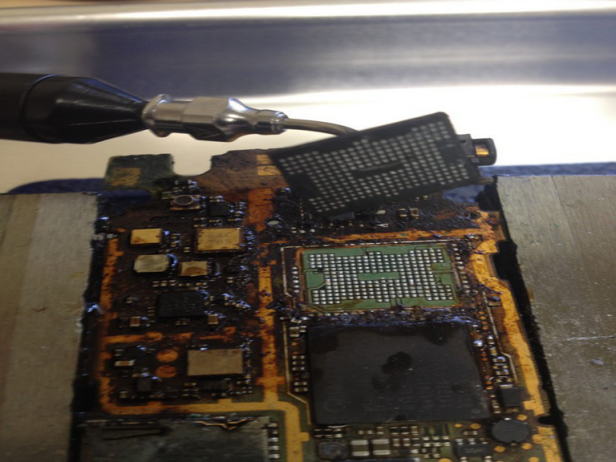
But before examining a damaged mobile device, a forensic investigator must determine what exactly is damaged in the device. The most common defect in mobile devices received for forensic examination are broken display watered and burned. They are not operational, but our experience has proven that there are usually simpler solutions for extracting data from damaged mobile devices.
Now let’s see how to utilize the tool SCE(SmartPhone Chip Extraction System) integrated into SPF to physically extract forensic images from a damaged mobile phone.
You can download SPF(SmartPhone Forensic System) from our resources page of the website and have a free trial.
Step 1. Use Professional Smart Phone Chip Removal Tools to remove the memory chip.
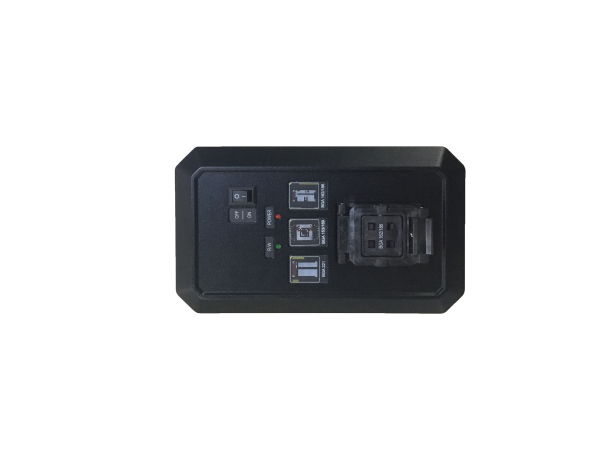
Step 2. Place Memory Chip on the SCE removal tool and connect to PC.
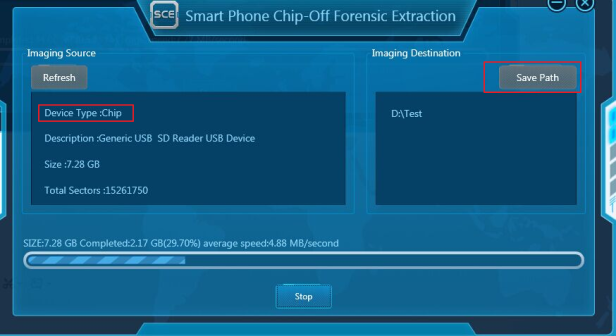
Step 3. Click “Tools” and select “Smart Phone Chip-Off”.

Step 4. Select Save Path and click “Start”.
Well, this is the procedure we extracted data from a memory chip, but what can we get from this image file? The answer is you can use any mobile forensic tool to import the image file for data analysis.
Here, we give you an example of using SmartPhone Forensic System(SPF)
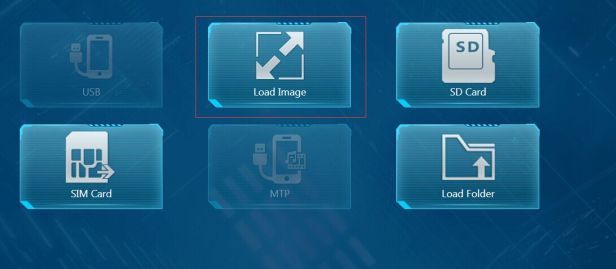
Step 1. Open SPF>Create Task>Load “Image File” from the path where we saved before>Click “OK” to go to next page and click “Acquire”.

Step 2. Select the items that you would like to acquire and Click “Start”.

Step 3. Now, we can start to investigate the case with SPF (SmartPhone Forensic System).

Conclusion: In situations where chip-off analysis is required, a tool must be able to carry out a successful extraction without damaging the phone further and based on the data analyzed in this demo, the SCE and SPF produce the excellent results in dealing with damaged mobile devices and provide more comprehensive steps for user operations and is considered to be highly recommended to the principle of digital forensics.

CHIP RECOVERY TIME CHIP encrypted HOW REMOVED ?
赞赞
About the details of your issue, please contact our technical support: [email protected] for help, thanks.
赞赞