
Editor’s note: Advanced imaging is a unique feature of SalvationDATA’s computer forensic product DRS. By utilizing our bad sector bypassing technology, advanced imaging function gives you a possibility to recover important data from the defective hard drive which is corrupted by bad sectors. There are a few parameters to be configured in advanced imaging for better performances in different situations. But the reality is, customers often feedback to us that they don’t know how the parameters work, so they just use default settings in every situation. So in this Tips article, let’s talk about these parameters in advanced imaging, and how should we set them in different situations.
Related Product: DRS (Data Recovery System)
System Settings
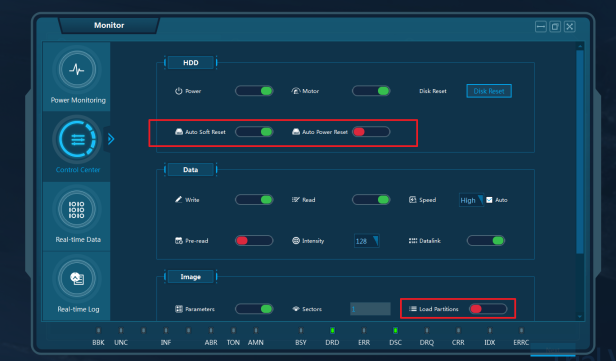
Before we start imaging, let’s first check out the recommended system settings.
– Auto Soft Reset: Enabled
– Auto Hard Reset: Disabled
– Load Partitions: Disabled
When auto-reset is enabled, DRS will automatically reset the hard drive in case it fails to respond at a certain point, but the normally soft reset is enough unless the hard drive’s condition is too bad.
Load partition option tells DRS to read partition information or not. For bad sector drives, you may be stuck in a non-stopping process if you attempt to read partition information. Besides, we usually just want to image the entire drive, so it is strongly recommended to disable this option.
Imaging Parameters
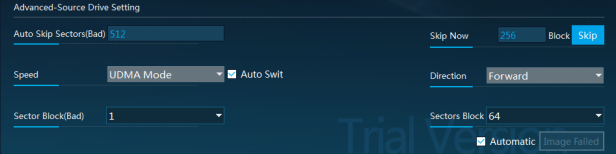
Now let’s take a closer look at the imaging parameters, these options will be available as soon as you start the advanced imaging process.
![[Tips] How Do the Parameters Work in DRS Advanced Imaging](https://blog.salvationdata.com/wp-content/uploads/2019/01/2-4.png?w=962&h=473)
1. Selective Imaging: This option enables or disables one or multiple heads to read data. You can find out more about selective imaging in our blog.2. Auto Skip Sectors: This option allows you to input the number of sectors to skip whenever DRS run into a bad sector. For example, like in the picture below, the number is set as 6, so 6 sectors are skipped automatically after bad sectors are detected.
![[Tips] How Do the Parameters Work in DRS Advanced Imaging](https://blog.salvationdata.com/wp-content/uploads/2019/01/3-4.png?w=616)
3. Speed: There are two kinds of imaging speed, UDMA (high speed) and PIO (low speed), check ‘Auto Switch’ to let DRS decide which mode to choose.
4. Sector Block (Bad): This option allows you to input the number of bad sectors to read on one read attempt. Setting this number high may increase the imaging speed.
5. Skip Now: Specify a number for manual sector skip. When clicking the ‘Skip’ button, DRS will instantly skip the number of blocks according to your input.
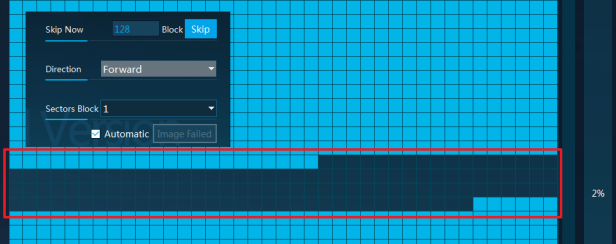
6. Direction: This option allows you to run the imaging process in the forward/reverse direction.
7. Sector Block: This option allows you to input the number of good sectors to read on one read attempt. Setting this number high may increase the imaging speed.
Recommended Settings
Now that we have known what are the purposes of every parameter settings, so how to set the parameters best suitable for your case. See below-recommended settings.
1. Auto Skip Sectors (Bad): Use default (512) unless the process is too slow, then try to set the number higher.
2. Speed: Use default (Auto Switch).
3. Sector Block (Bad): Set as ‘1’, but if there are too many bad sectors, and the process is too slow, set the number higher.
4. Skip Now: If the process is stuck in a bad sector concentrated area, use this function to quickly skip it.
5. Direction: Forward
6. Sector Block: 64
Conclusion
Thanks for reading our [Tips] article! Keep following our blog, we’ll be posting more helpful small tips in the future. If you are interested in our mobile forensic product, come and check out our website for more information. You can also go to our resource page to download our forensic products for free. We welcome you to contact us and claim your free product trial!
